



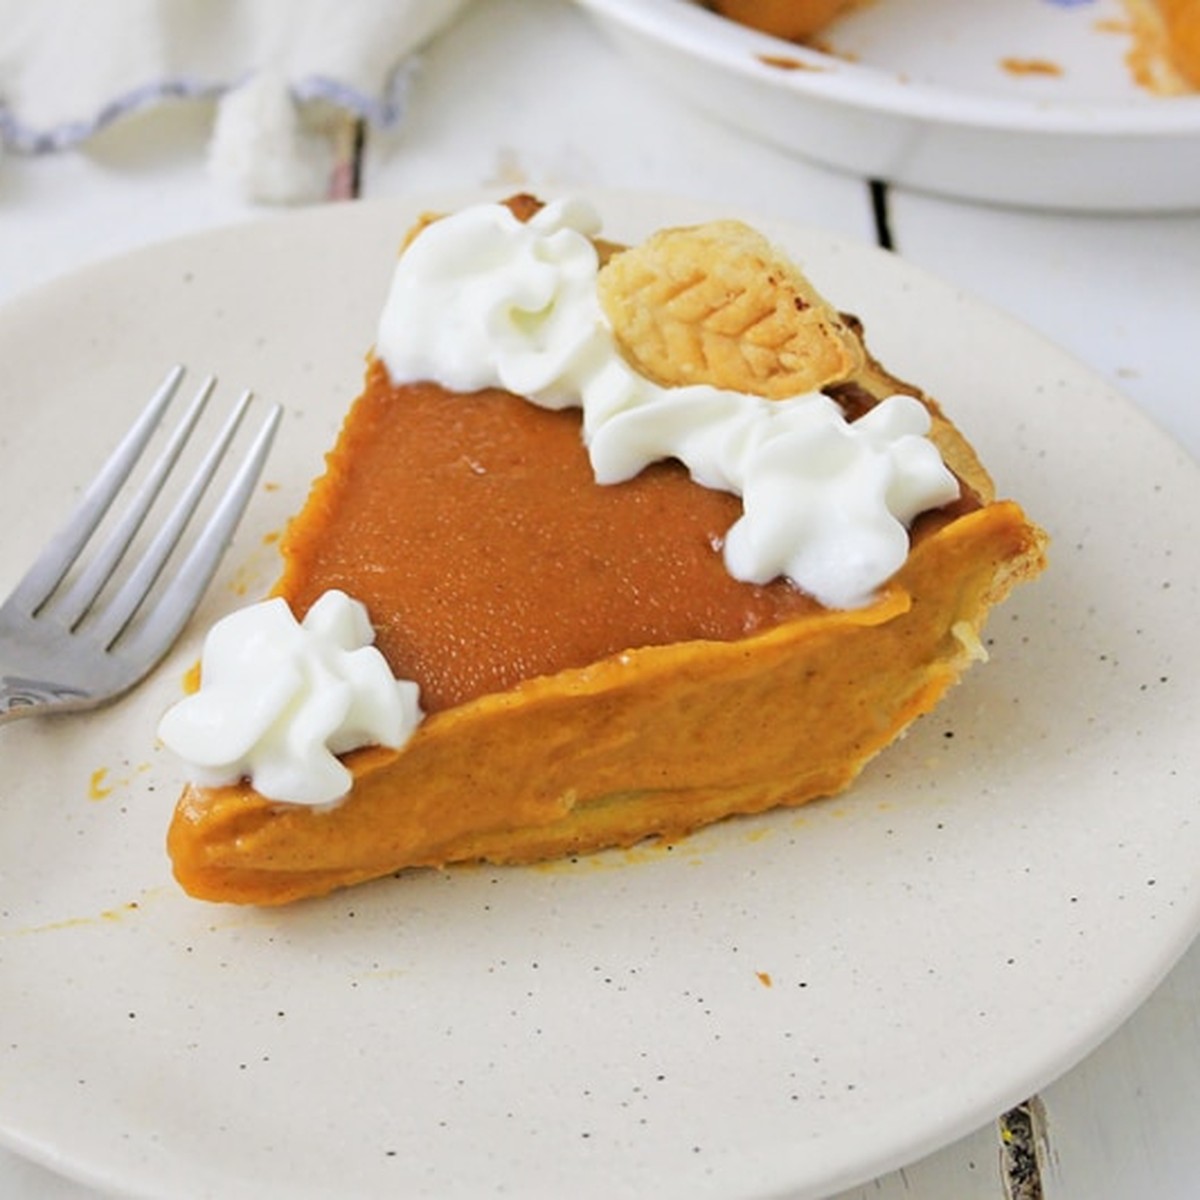
This vegan pumpkin pie is a dairy-free version of the Thanksgiving favorite, finished with a big, fluffy pile of coconut whipped cream. A rich, creamy pumpkin filling bakes up in a perfectly flaky homemade crust, and the lightly sweet coconut cream on top makes every slice taste like the holidays.

Jump to:
I've been perfecting this vegan pumpkin pie recipe for months and I'm so excited that I finally have something extra special for Thanksgiving dessert.
It is so rich and creamy with the perfect custard texture, and no eggs, and no dairy, which means I can have a really … really … really … large slice. And feel perfectly fine about it. The real star, though, is the topping: a cloud of homemade coconut whipped cream that tastes every bit as good as the dairy kind. Let's go make a vegan pumpkin pie!
Key Ingredients & Substitutions
- Canned pumpkin puree. Use plain 100% pumpkin, not pumpkin pie filling, which is already sweetened and spiced. If you'd rather start from scratch, homemade pumpkin puree works too; just drain it well so the pie isn't watery.
- Full-fat canned coconut milk. You'll need two cans: one goes into the filling and replaces the evaporated milk and eggs, and the other is chilled overnight for the whipped cream. Light coconut milk won't set up properly in either place. A can of coconut cream is an even more reliable choice for the topping.
- Brown sugar, maple syrup and granulated sugar. The mix of sweeteners gives the filling a deep, caramel-like flavor. You can swap coconut sugar for the brown sugar if you like.
- Pumpkin pie spice and cinnamon. Store-bought pumpkin pie spice is easiest, or blend your own cinnamon, ginger, nutmeg and cloves.
- Cornstarch. This thickens the filling so it slices cleanly without eggs, and a little bit in the coconut whipped cream helps it hold its shape. Arrowroot powder works in both.
- Crisco and flour. Crisco all-vegetable shortening is vegan and makes a very flaky crust. Cold vegan butter or refined coconut oil also work, or use a store-bought vegan crust to save time.

Making the Vegan Pie Crust
If you'd like to cut the work down a bunch, you can go ahead and use a store-bought vegan pie crust. I do this sometimes too, and it works just as well. But there's something special about making your own for the holidays.
Making pie crust dairy-free can be very tricky because butter can be hard to replace. However, I've been integrating Crisco into my dessert makeovers lately and I've been wonderfully surprised at how it always gives my pies that perfect tender, flaky texture.
Crisco is a vegetable shortening that is completely vegan and one of the best butter substitutes you can use when making non-dairy pies. It acts similarly to lard in baked goods and it's known for giving pies a fantastic flaky crust. (If you'd rather bake with a vegan butter, here's our guide to the best vegan butter brands.)
So now that the butter is out of the way …
Combine the flour and sugar in a large bowl. Cut in the Crisco shortening with a pastry cutter, or use 2 knives or your fingertips, until the mixture is the size of green peas. It should look like coarse crumbs.
Add the water and toss gently with a fork until the dough forms into a ball. This recipe makes enough dough for two crusts, so divide it in half and flatten each half into a disk. You'll use one for this pie; freeze the other for your next one (or use both for a double-crust pie). Wrap the dough tightly with plastic wrap and refrigerate for 30 minutes or overnight.
Remove the dough from the refrigerator and place it between two pieces of parchment paper that have been lightly sprinkled with flour. With a rolling pin, roll the dough gently until it's about 2 to 3 inches larger than the pie pan you're using. So, for a 9-inch pie, roll to 11 or 12 inches in diameter.

When transferring the dough to a pie plate, be careful not to stretch the pastry. Trim any hanging pastry about ½ to ¾ inch beyond the edge of the pie plate before crimping the edges.
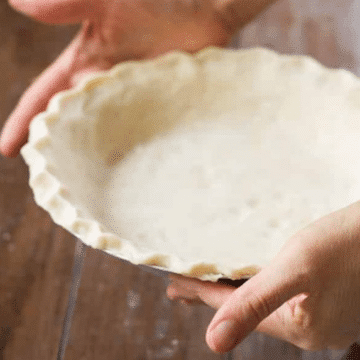
Crimp the edges by pinching the dough between your forefinger and thumb all the way around the pie. See the picture below for an example. Now you have a tender and flaky pie crust ready for your favorite filling!

And if you want to get really fancy, you can make some adorable fall-themed shapes from extra pie crust dough to decorate the edges. Check out my Pumpkin Pie with Homemade Crust for instructions.
Making Vegan Pumpkin Pie Filling
Making the filling is super easy! Just put all the ingredients in a large bowl (pumpkin, coconut milk, brown sugar, maple syrup, sugar, pumpkin pie spice, cinnamon and cornstarch) and whisk until everything is smooth and well mixed.

Then, pour it into your prepared pie crust. You first bake the pie in a 425°F oven for 15 minutes. Then, turn the oven down to 350°F and bake for another 45 to 50 minutes.

Helpful Tips
Pumpkin pie is a custard, and like any custard it has to be baked slowly so that it cooks through evenly. Here are a few secrets to getting a silky smooth pie.
Bake in 2 stages. We bake the pie in 2 stages: first at a high 425°F to set the structure of the crust, then at a lower 350°F to gently finish cooking the custard filling without cracking it. If the crust edges brown too quickly, cover them loosely with strips of foil or a pie shield.
Watch for the jiggle. Give your pumpkin pie a little shake. The edges should be set and the center should still be slightly jiggly; it firms up as it cools. If you're not confident about the jiggle test, use a digital instant-read thermometer to check the internal temperature. When it reads 175°F in the center of the custard, pull the pie out of the oven right away.
Cool it slowly. Allow the vegan pumpkin pie to cool completely at room temperature before putting it in the refrigerator to chill. This prevents the custard from cracking. Chill overnight or at least 4 hours so it slices neatly.

Chill the coconut milk the night before. Put the can for the whipped cream in the fridge when you start the crust (or the night before). It needs at least 4 hours for the cream to separate and firm up, and the pie needs that long to chill anyway.
Use pumpkin as an egg replacer elsewhere, too. Canned pumpkin is a handy substitute for eggs in many baked goods. It adds moisture to cakes, cookies, muffins, breads and brownies. Just add ¼ cup canned pumpkin for each egg called for in the recipe, like in these healthy pumpkin muffins.
Coconut Whipped Cream Topping
Pumpkin pie with coconut cream on top is one of my favorite fall combinations. The whipped coconut cream is light, cool and just barely sweet, with a subtle coconut flavor that plays really nicely with the warm spices in the pie. There are many dairy-free and vegan whipped toppings you can buy these days, but be aware that some of them actually contain milk-based ingredients, and homemade takes about 5 minutes.
Pick the right can. Use full-fat canned coconut milk or, even better, canned coconut cream. Cans with fewer additives and a thick layer of solid cream on top whip best. Brands vary a lot, so if one can stays thin and soupy after chilling, try a different brand next time. It helps to keep a spare can in the fridge during the holidays.

Chill, then scoop. Put the unopened can of coconut milk in the refrigerator for at least 4 hours. (I usually leave it in overnight.) Grab the can out of the refrigerator, being careful not to shake it, open it and scoop out only the cream that is now solid and floating on top. Save the leftover coconut water for a smoothie. For the fluffiest results, chill your mixing bowl and beaters for 10 minutes too.
Whip and stabilize. Beat the coconut cream in a large bowl until smooth, about 1 minute. Mix the sugar and cornstarch together, then add them to the cream with the vanilla. The cornstarch stabilizes the whipped cream so it holds up longer on the pie. Keep beating until it's light and fluffy with soft peaks, 2 to 3 minutes more. A stand mixer or an electric hand mixer makes quick work of it.

Top the pie just before serving. Coconut cream softens as it warms up, so dollop or pipe it onto the chilled pie right before you bring it to the table. A piping bag with a star tip gives you those pretty swirls in the photos. If your cream turns grainy or won't thicken, it's usually too warm: pop the bowl back in the fridge for 15 minutes and whip again. And there you have it: perfect coconut whipped cream to pile on top of your Thanksgiving vegan pumpkin pie!
Variations
- Maple coconut whipped cream. Swap the sugar in the topping for 1 to 2 tablespoons of maple syrup to echo the maple in the filling.
- Spiced whipped cream. Beat a pinch of cinnamon or pumpkin pie spice into the coconut cream, or add a splash of bourbon for a grown-up version.
- Different crust. Try our Homemade Coconut Oil Pie Crust, or press a crumb crust of crushed vegan gingersnaps and melted coconut oil into the pan.
- Extra spice. Add ½ teaspoon of ground ginger and a pinch of cloves to the filling for a bolder, spicier pie.
- Pecan topping. Sprinkle toasted chopped pecans or candied pecans over the coconut whipped cream for crunch.
- A second take. If you'd like to compare recipes, our Vegan Pumpkin Pie is another dairy-free version worth a spot on your holiday table.
Serving Ideas
This pie is made for Thanksgiving and Friendsgiving dessert tables. Serve it well chilled, with a generous swirl of coconut whipped cream on each slice and an extra bowl of cream on the side for anyone who wants more (there's always someone). A light dusting of cinnamon on top looks lovely too.
For a full fall dessert spread, set it out next to a batch of Easy Vegan Pumpkin Bars and a pan of Vegan Apple Crisp. It's also great with hot coffee, chai, or a mug of Vegan Holiday Nog.
Storing & Make-Ahead
Store leftover pie covered in the refrigerator for up to 4 days. It's best to keep the coconut whipped cream separate in an airtight container, where it will keep for 3 to 4 days. It firms up in the fridge, so give it a quick whisk to fluff it back up before serving.
This is a great make-ahead dessert, since it needs to chill anyway. Bake the pie 1 to 2 days before serving, and whip the cream the morning of or right before serving. The pie crust dough can be made up to 3 days ahead in the fridge or 3 months ahead in the freezer. The baked pie (without topping) also freezes well: wrap it tightly in plastic wrap and foil and freeze for up to 2 months, then thaw overnight in the refrigerator before topping and serving.

More Vegan Pumpkin Desserts
If you love this vegan pumpkin pie, be sure to check out these other tasty ideas too:
- Vegan Pumpkin Pie
- No-Bake Vegan Pumpkin Cheesecake
- Easy Vegan Pumpkin Bars
- Easy Vegan Pumpkin Recipes
📖 Recipe
Ingredients
For the crust
For the pumpkin pie filling
- 15 oz pumpkin puree
- 15 oz coconut milk, full-fat canned
- ⅓ cup brown sugar
- ¼ cup maple syrup
- ¼ cup sugar
- 2 teaspoon Pumpkin pie spice
- 1 teaspoon ground cinnamon
- 3 tablespoon cornstarch
For the coconut whipped cream
- 15 oz coconut milk, full-fat canned (or coconut cream), chilled overnight
- 2 tablespoon sugar
- 2 teaspoon cornstarch
- 1 teaspoon vanilla, extract
Instructions
For the pie crust
- In a large mixing bowl, combine the flour and pinch of sugar. Cut in the Crisco with a pastry cutter, 2 knives or your fingertips until the mixture looks like coarse crumbs the size of small peas.
- Add the hot water and toss gently with a fork until the dough comes together into a ball.
- Divide the dough in half and flatten each half into a disk. Wrap tightly in plastic wrap and refrigerate for at least 30 minutes (or overnight). You'll use one disk for this pie; freeze the other for later.
- Place one disk of dough between two lightly floured sheets of parchment paper and roll it into an 11 to 12-inch circle. Transfer it to a 9-inch pie plate without stretching it, trim the overhang to about ½ to ¾ inch, and crimp the edges with your fingers.
For the pie filling
- Preheat the oven to 425°F.
- In a large bowl, whisk together the pumpkin, coconut milk, brown sugar, maple syrup, sugar, pumpkin pie spice, cinnamon and cornstarch until smooth and completely blended. Pour the filling into the prepared crust.
- Bake at 425°F for 15 minutes, then reduce the oven temperature to 350°F and bake for another 45 to 50 minutes, until the edges are set and the center is still slightly jiggly (175°F on an instant-read thermometer). If the crust edges brown too quickly, cover them loosely with foil.
- Set the pie on a wire rack and let it cool completely at room temperature, about 2 hours. Then cover and refrigerate for at least 4 hours or overnight before topping and serving.
For the coconut whipped cream
- Refrigerate the unopened can of coconut milk for at least 4 hours or overnight. Chill your mixing bowl and beaters for 10 minutes before whipping.
- Without shaking the can, open it and scoop out only the solid cream that has separated on top (save the liquid for smoothies). Beat the cream on high speed with a stand mixer or hand mixer until smooth, about 1 minute.
- Mix the sugar and cornstarch together, then add them to the cream along with the vanilla. Beat on high until light and fluffy with soft peaks, 2 to 3 minutes. Pipe or spoon onto the chilled pie just before serving. Enjoy!
Notes
- Crust: the crust ingredients make enough dough for two 9-inch crusts. Use one for this pie and wrap and freeze the other for up to 3 months (or use a store-bought vegan crust instead).
- Coconut whipped cream: use full-fat coconut milk or coconut cream, and chill the unopened can for at least 4 hours or overnight. If the cream won't whip, chill the bowl and cream for 15 minutes and try again.
- Storage: keep the pie covered in the refrigerator for up to 4 days. Store the whipped cream separately and top slices just before serving. The baked, untopped pie freezes for up to 2 months.

Something to say? Leave a comment.