Do you ever think about how different foods came to be? Who discovered that we can eat potatoes? How did someone come up with the idea to grind wheat into flour and make bread with it? I'm always asking myself these questions and I also spend a lot of time wondering how foods are made too. Like tofu! How do you make tofu?
I always knew tofu was made from curdled soybeans, but how do you curdle soybeans? And how did someone decide that this was a thing that could be done?! There are a lot of tofu making kits for sale out there, but I decided to forego the kits and try to do it myself. A little bit of Googling turned up pages and pages of tofu making tutorials, but I decided to go with one on NPR's Kitchen Window. Making my own tofu! It seemed doable! My tutorial is slightly adapted from that one, based on my own tofu making experience.
 Make Your Own Tofu
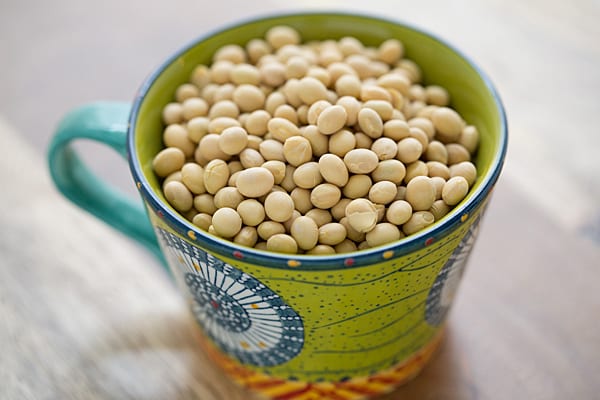
The tofu making process starts with dried soybeans-1 ½ cups, to be exact. I bought mine in the bulk section at Whole Foods.
Whenever I use soy in a recipe, it's inevitable that I get a comment or email complaining about it because "soy is GMO." Well no, not all soy is GMO. The tofu I buy is GMO-free, and the soybeans I used in this recipe are organic and GMO-free too. So if you're concerned about GMOs, please don't think you can't make or eat tofu!
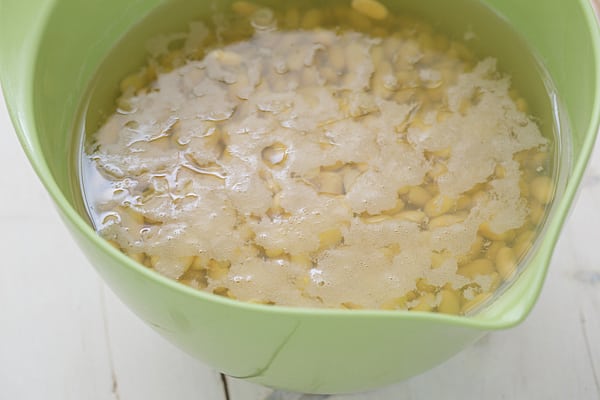
The soybeans are soaked in 4 ½ cups of water for at least 8 hours or overnight.

After the soaking, you transfer the beans and soaking water to a food processor or high-powered blender (I used my Vitamix). Process the mixture until the beans are ground and the liquid is smooth.
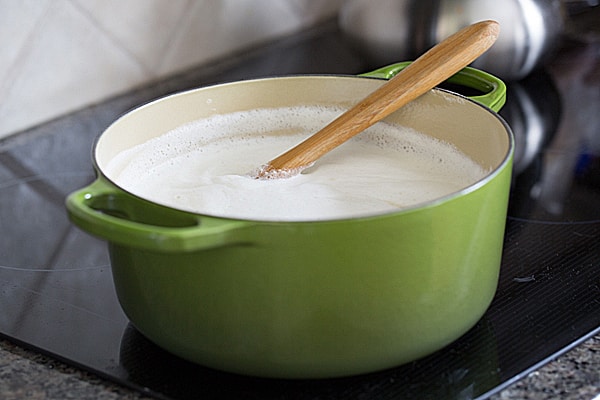
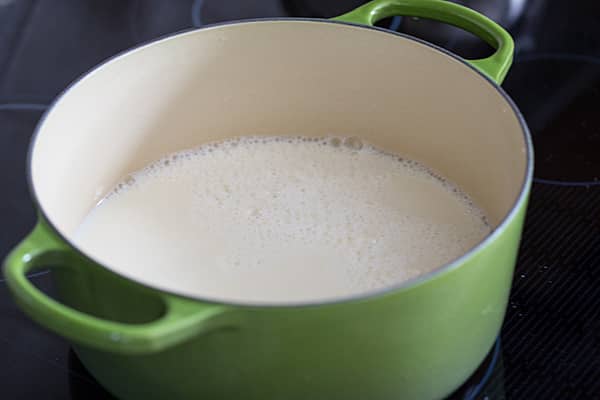
Now you've got your soybean slurry all ready to go. Good! Bring 5 cups of water to a boil in a large pot or Dutch oven and stir in the soybean mixture. Reduce the heat to medium and stir constantly. When the mixture is simmering, almost coming to a boil, reduce the heat to low and continue to cook (and stir!) until a layer of foam forms-about 8 minutes.
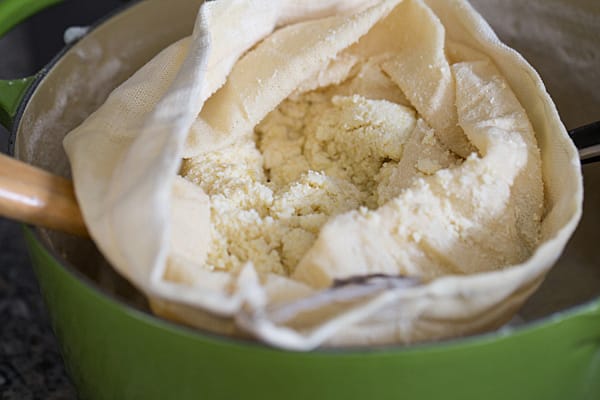
Now you need to separate the ground up beans from the soymilk. The original tutorial calls for a cheesecloth here, but I found a nut milk bag![]() to be much easier to work with. Put your nut milk bag in a large bowl and pour the contents of the Dutch oven into it. Carefully lift the bag out of the bowl and let the liquid strain out. I used a wooden spoon to press out as much liquid as I could. Discard the ground soybeans or save them for another use. (This soybean pulp is called okara and there are recipes out there that call for it! I'll be honest, I discarded mine, mostly because I didn't have time to make another recipe.)
to be much easier to work with. Put your nut milk bag in a large bowl and pour the contents of the Dutch oven into it. Carefully lift the bag out of the bowl and let the liquid strain out. I used a wooden spoon to press out as much liquid as I could. Discard the ground soybeans or save them for another use. (This soybean pulp is called okara and there are recipes out there that call for it! I'll be honest, I discarded mine, mostly because I didn't have time to make another recipe.)
Give your Dutch oven a quick rinse, then pour the soymilk back into it. Heat the soymilk over low heat, stirring frequently. While that's heating, stir together 1 cup of water with ¼ cup fresh lemon juice. This is your coagulant! It's what makes the soymilk curdle. (Side note: See why I never take photos in my kitchen? It's dark! And impossible to photograph in!)
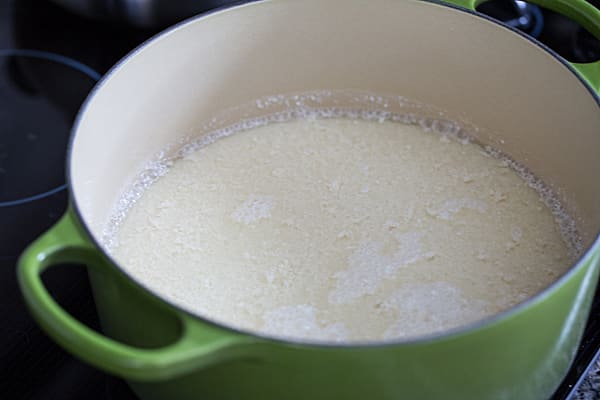
Once the temperature of the soymilk is between 150°F and 155°F, remove it from the heat. I have a digital thermometer that decided to malfunction at this moment (thanks, digital thermometer!), so I had to guess. My tofu still worked out in the end, so if you don't have a thermometer, don't panic. I knew that if the soymilk was boiling, it would be way above 150°F. I figured that if it was simmering, it would also be too hot. So my soymilk was not quite simmering, but still too hot to touch.
At this point, add half of the coagulant to the Dutch oven and stir with a spatula 6 times, in a circular pattern. After 6 stirs, stop the spatula in its tracks, holding it upright in the pot until the soymilk stops moving. Pour in the rest of the coagulant and gently stir in a figure-eight pattern until small curds start to form. Cover the pot and let it sit for 15 minutes. After 15 minutes, it will look like this-there will be a layer of water on top, with curds on the bottom.
Curds! Rinse out your large bowl and nut milk bag because you're going to use them again.
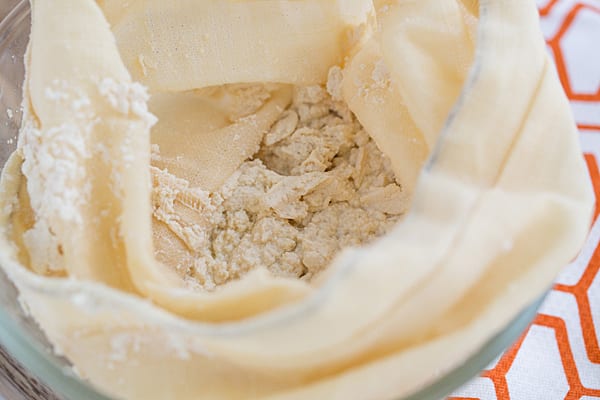
Put the bag in the bowl and then use a slotted spoon to transfer the curds from the Dutch oven to the bag. Once all the curds are in the bag, squeeze as much liquid out as you can.
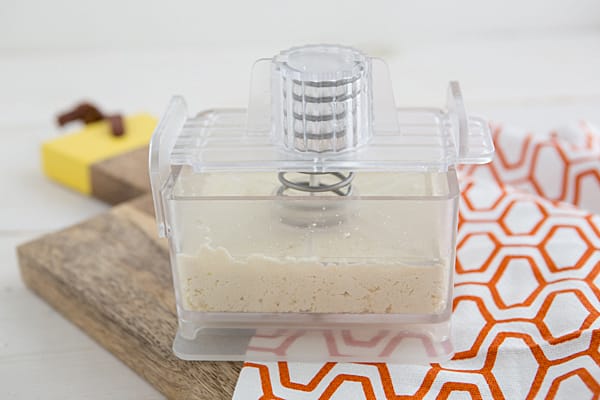
At this point, I transferred the tofu to my handy tofu press![]() . If you don't have a tofu press, you can keep the tofu in the nut milk bag (or wrapped in a cheesecloth) and put a plate on top of it, then something heavy (like cans of soup) on top of the plate to press the liquid out. Press the tofu like this for 15 minutes. Drain out the excess water and refrigerate for an hour.
. If you don't have a tofu press, you can keep the tofu in the nut milk bag (or wrapped in a cheesecloth) and put a plate on top of it, then something heavy (like cans of soup) on top of the plate to press the liquid out. Press the tofu like this for 15 minutes. Drain out the excess water and refrigerate for an hour.
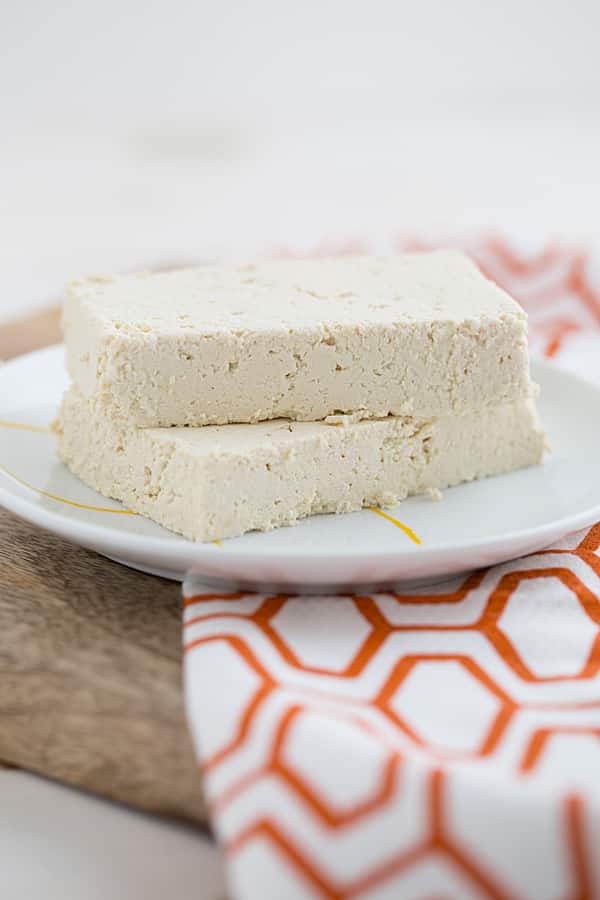
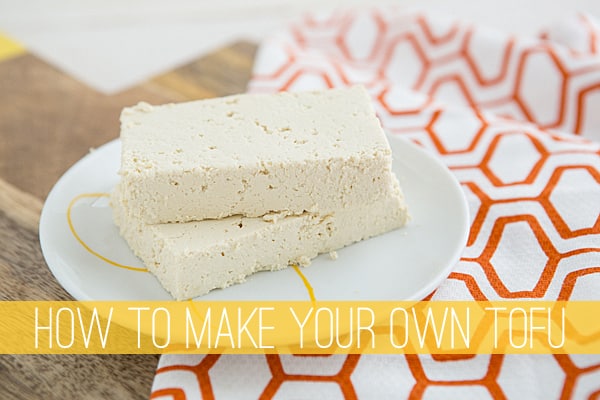
Tofu! Homemade tofu is more firm than silken tofu, but softer than the firm tofu I usually buy. It crumbles more easily, but I think the taste is better than the kind you buy at the store. That said, I'm not going to be making all my tofu from now on. This is one of those I-want-to-know-how-it's-made-and-now-I-do projects, like when I made sandwich bread. You can use your homemade tofu right away or immerse it in cold water and store it in the refrigerator for up to 3 days.
Tofu Recipes
Now that you know how to make your own tofu, what are you going to do with it? Here are some ideas from my blog. (And yes, you can use store-bought tofu in them too!)

1. Crispy Tofu Sandwiches with Ginger Peanut Sauce
2. Coconut-Lime Tofu Soup
3. Thai Tofu & Noodle Salad
4. Freezer-Friendly Greens & Tofu Scramble Wraps
5. Orange Cardamom Chocolate Mousse
6. Thai Red Curry with Asparagus and Tofu
7. Baked Barbecue Tofu
8. Vegan Dark Chocolate Pomegranate Mousse
Disclosure: The links to Amazon in this post are affiliate links. If you were to make a purchase from them, I'd receive a small percentage of the sale price. This helps support Oh My Veggies!


Kelly @ Texas Type A Mom says
That's really neat you can make your own tofu! It looks like a labor of love - like making your own cheese!
Kiersten says
This has completely put me into DIY mode. I'm trying to convince Chris that we should try homebrewing now. Which I'm sure would be a disaster. 🙂
Lisa @ Greek Vegetarian says
Wow, I never knew how tofu was made. Probably because I was too scared to know. I really love tofu but the whole fermenting side of it was something I didn't want to know about. But it's really not much different to making ricotta cheese! Nothing like the image I had in my head of bags of curds left out in a dank and moldy store room to grow spores and fungus over a period of weeks before packing into tofu blocks. Which was a stupid thing to think anyway because as far as I know, all our tofu here in Australia is GMO free.
Kiersten says
Ha! No, it's nothing like that at all. Now tempeh, I'm not sure I want to know how THAT is made. I try to mentally block the fact that it's full of mold when I open up the package. 😉
Kelly @ A Girl Worth Saving says
Wowza, ok you know I don't eat Tofu but I seriously love how you made your own!
Amanda Gilds says
Very cool! I love tofu, but haven't thought about making it. Though I have been thinking about making my own ricotta....
Kiersten says
I want to tackle ricotta next. 🙂
Richa says
i am sure home made tofu tastes so much better.. great job and making it at home
Kiersten says
It really does taste better! 🙂
Alex @ Delicious Knowledge says
I love homemade tofu! Last week I was fortunate to attend a tofu-making demo with the soybean council and we tried different flavors: pesto, basil, jalapeño. So delicious! They had special containers made for pressing but it looks like the tofu press worked really well for you- I'm going to get it.
Kiersten says
So they put the flavors IN the tofu?! Instead of marinating it? OH WOW! I am so going to try that! 😀
Robin (Masshole Mommy) says
Oh wow, I didn't even know you could make your own tofu. This is awesome.
skoraq cooks says
Brilliant post and easy to follow step by step instructions. So no more excuses. I can make tofu by myself 🙂 Thanks very much for sharing 🙂
Kiersten says
Yes, you can! 😀
Amelia Katz says
Holy crabs. This is awesome <3 Thank youuu!
Kiersten says
Holy crabs--I'm going to steal that one. So thank YOU.
Genevieve says
Wow, I can't believe you actually made your own tofu from scratch! Like you, I don't think this is something I would attempt on a regular basis, but it would be a fun project to try once and compare to the storebought brands, and also to learn exactly how tofu is made and where it comes from.
Kiersten says
I definitely admire people who do this sort of thing regularly, but yeah, it's a little too involved for me. But it's still easier than I thought it would be!
Kiran @ KiranTarun.com says
Kudos! What a delicious and amazing effort. I've made soy milk before but i need to attempt tofu at one point.
Kiersten says
You should! It's only a few more steps than soy milk...
Christel Harden says
Just in case there is anyone reading who doesn't already know: Certified organic foods cannot contain genetically modified organisms, so buying organic is the easiest way of avoiding GMOs, if that is your intent.
Kiersten says
Thank you! 🙂
Nathan Graham says
Hi Kiersten,
Thanks for the guide, very well written and photographed! Was wondering approximately how much finished tofu you got from that 1-1/2 cups of beans (as in 100g? 200g? etc). Thanks
Nate
Kiersten says
I didn't weigh the tofu afterwards, but it was about half the size of a store-bought block of tofu, so I'd guess around 200g.
Jessica says
Is is possible to use this same method with other beans such as white beans or brown lentils?
Kiersten Frase says
I haven't tried it myself, but I've heard it works with dried chickpeas!
Frida says
You are genius!
Thank you for sharing <3
Hugs
Frida, Denmark
http://www.fridaspeach.wordpress.com
Jenni says
I'm wondering how much soy milk you made before using it to make the tofu? I have some soy milk And want to use it to make tofu but wasn't sure if adding the coagulation mixture would be the right amount for me, I have just under a half gallon of soy milk to use. Thanks!
Kiersten Frase says
I didn't measure, so I'm not sure. But unless you're using soy milk that's made only with water and soy beans, I don't know if it would work to make tofu. There are probably additives and such that would change the way it reacts to the coagulant!
Jenni says
Okay thanks! I got the soy milk from a fresh tofu restaurant and it only lasts for a week so I think it will work okay for making tofu but I'll know why it doesn't work, thanks for the tip!
Julie says
Uhh oh! I messed up. I cooked it down and had a beautiful foam on top then ran it through the cheesecloth. My okara looked great but no milk, just a broth like substance. 🙁
What did I do wrong???
Kiersten Frase says
It's hard to say - so the liquid left in the pot was more clear than white? The only thing I can think of off-hand is maybe the soybeans weren't blended well enough.
miachel | spiced curiosity says
You're awesome! I'm similar in that I love to know how things are made, and this is a great step-by-step tutorial on how to do it yourself. Thanks!
Kiersten Frase says
It's always fun to make things at least once, right? 🙂
Marie says
Hey! First of all, what a beautiful blog! I found this recipe as I was trying to make tofu today. However, it turned out quite crumbly and fell apart (I wasn't able to pick a bite of tofu up with my fork 🙁 )
I didn't use the exact measurements you are using, but the same ingredients (lemon juice as coagulant). Do you know where I went wrong? I might not have pressed it long enough, however I feel like it would still be crumbly... (The taste was great though!)
Alissa says
Hi Marie! You might want to try pressing it longer. The mixture can be pretty deceptive - the first few times I made tofu I thought I had done it all wrong and that it would crumble for sure after pressing, but it came out perfect. Also, as far as the measurements go, I would just make sure you're keeping the ratio of soybeans to lemon juice that the tutorial calls for. I've also heard that epsom salt works as a coagulant, but I haven't tried it - might be worth a shot though!
Inderjeet Kaur says
I wonder if tofu could be made from soy milk. I make Indian paneer all the time from milk using a process similar to yours except I have curds and whey, no okara.
lisa says
I didn’t use the exact measurements you are using, but the same ingredients (lemon juice as coagulant). Do you know where I went wrong? I might not have pressed it long enough, however I feel like it would still be crumbly… (The taste was great though!)
Rachael says
Thank you! Just completed the coagulation and about to put it in the press in 10 minutes. So much appreciation for your walk through, had all the ingredients and press, etc., but not sure how - thank you!