
Confession: I was in my early 20s before I knew what garlic was. I don't think my family ever cooked with garlic, unless it was garlic powder. We did, however, eat a fair amount of garlic bread. And you know how garlic bread has little bits of parsley on it?
I thought that was garlic. For years I thought that was garlic. I mean, it was called garlic bread, right? Not parsley bread! So I figured garlic was some kind of green herb.

Once I started cooking for myself and making recipes I found elsewhere, I discovered that garlic was not an herb at all. And I also discovered that I loved garlic. Loved it! And when it's roasted, it's like WHOA. The flavor mellows out and it becomes almost buttery. If you don't make roasted garlic, you should. Because: WHOA.
Here's how to roast garlic:
 Start by peeling the papery outer layers from a large head of garlic. You should be able to see the individual cloves, but leave the skin on those.
 Now cut the top off. You'll want each clove to be exposed, so how much you cut off depends on the size of the garlic head. Usually it's about ¼-1/2 inch.
 Place the garlic head in a ramekin and drizzle it with oil.
 Then season the garlic with salt and pepper. I like a lot of pepper on mine.
 Cover the ramekin with foil and bake at 350 degrees for about an hour. This also depends on the size of the garlic head--larger cloves of garlic will take longer to roast.
 The garlic is done when it can be easily pierced with a fork and the cloves are golden brown.
(PS: Your kitchen will smell amazing.)
 Squeeze the individual garlic cloves out of the peel. Some cloves might need a little help; use a paring knife to cut the skin off of those.

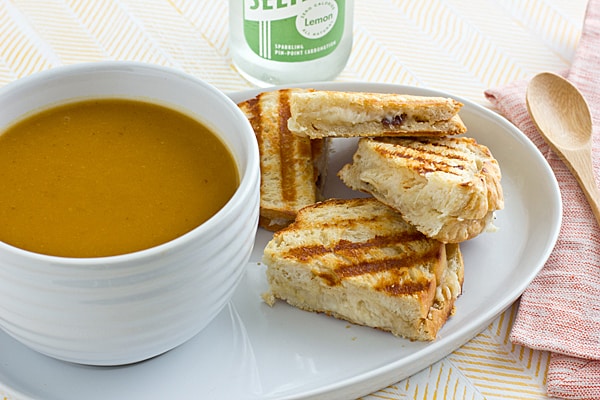
Roasted garlic can be used in many different, delicious ways. Mashed potatoes! Pasta! Tossed with veggies! But my favorite way to use it is on bread. It makes a mean garlic bread (real, actual garlic bread!) and it's also a fantastic sandwich spread, like in the Roasted Garlic Grilled Cheese Sandwich recipe below.
Recipe
Ingredients
- 1 medium head garlic roasted according to instructions above
- salt + freshly cracked black pepper to taste
- about 1 tablespoon butter softened
- 4 slices crusty bread
- 2 slices or ½ cup shredded cheese just about any cheese will work!
Instructions
- Preheat panini press to high heat or a large skillet or griddle over medium-high heat.
- Mash roasted garlic cloves with the back of a fork. Season with salt and a liberal amount of black pepper, to taste.
- Butter one side of two slices bread. Place on panini press or griddle. Top each with ¼ cup of cheese. Spread bottom of remaining bread slices with roasted garlic; press onto cheese. Butter the top of each sandwich. Heat about 5 minutes on panini press, until browned. If using a skillet or griddle, heat about 3-4 minutes on each side.
Diane (createdbydiane) says
Oh I just LOVE roasted garlic!
Kelly @ A Girl Worth Saving says
Yum! I seriously need to do this more often as there is nothing like the taste of roasted garlic.
Kiersten says
And you can put it on everything! EVERYTHING!
Natalie says
It's amazing how different roasted garlic tastes than raw, it's like two completely different things! I've never thought to use a ramekin (I just wrap it up in a foil package but do everything else the same), I wonder if it's better that way - might have to test soon!
Kiersten says
I used to do it that way and sometimes the foil would get stuck, so I started doing it this way instead. But I bet it doesn't make much of a difference flavor-wise!
Shirley says
You're kidding!! Then again I didn't know what most vegetables were when I was a kid. Which was embarrassingly apparent in my first job as a teen supermarket cashier who had trouble ringing up produce because I couldn't identify the veggies. Some people were so impatiently annoyed. Roasted garlic also freezes very well, if you ever want to roast several heads at once.
Kiersten says
Oh, that happens to me all the time at the grocery store! I don't get annoyed because I assume it's my fault for buying the freaky weird stuff that the cashiers never see. Thanks for the tip on freezing!
Lena says
I love garlic. And I adore roasted garlic. (Anything else would be unthinkable, I mean, I decided to name my blog Mrs. Garlic Head for a reason, right?
And a grilled cheese sandwich with roasted garlic sounds like a dream come true. I'd love one for lunch today.
Kiersten says
Well, given the name of your blog, you really need to give this sandwich a try! 😀
Stephanie @ henry happened says
oh, so that's what garlic is! haha. I grew up thinking garlic came diced in those glass containers you keep in the fridge. I definitely need to try this - love me some garlic bread (even the stuff with parsley!)
Kiersten says
Ha! You know, I have heard from a few people saying that they only use that jarred garlic in their cooking--I have never tried it! And I'm not against conveniences like that, I guess it just never occurred to me.
Jennifer H says
mmm mmm mmm! Looks so good.
Heidi @ Food Doodles says
This. Sounds. Wonderful! Why have I not thought of this before?
Kelly @ Texas Type A Mom says
I know what I'm having for lunch tomorrow! I've never roasted garlic before, only browned it. I've always been lazy about preparing garlic and buy the garlic in a jar but this looks way more flavorful!
Kiersten says
If you're going to buy fresh garlic, this is probably one of the easier things to do with it. No mincing required!
Ouida Lampert says
I love roasted garlic - and I roast a LOT at once and freeze it. We use it in salad dressing (it's our "house" dressing).
Kiersten says
I've never thought to use it in salad dressing, but that sounds so good! I'm gonna have to do that...
Melissa B. { hungryfoodlove } says
Congratulations on being featured on DailyBuzz Food Top 9 for this recipe. I was featured too with my Roasted Garlic Spread. Your pictures are lovely!
Kiersten says
Thank you--and congratulations to you too! 😀
Rituparna says
Just the thought of all that delicious flavours that will get released after roasting makes my mouth water. Garlic is an essence ingredient in all kinds of Indian cook, but roasted garlic sound delicious! Love the idea.
Kiersten says
Its really great roasted--the flavor is completely different and the texture is almost buttery!
Lynn Terstegge says
How to peel garlic...fast:
Separate bulbs into cloves. Place cloves in a large stainless bowl (or plastic might work). Take same sized bowl and invert over the bowl containing garlic cloves making a large hollow chamber. Hold bowls together tightly and shake the dickens out of it. It will be loud, if metal, but only takes 10 seconds or so (I've never actually timed it). Open bowls and pick out 'peeled' cloves. Repeat process if there are still unpeeled cloves.
Really! This works. I can process several bulbs in just a few minutes.
Kiersten says
Thanks for the tip! Since the garlic is roasted first here, I'm not sure if that would work the same way, but I will definitely try it the next time I need fresh garlic for a recipe. 🙂
Lynn Terstegge says
It won't work once roasted. Separate before roasting and there is no waste or mushy hassle.
Courtney says
I love this recipe! My husband and I will be making it this week! Thank you for the inspiration. I absolutely adore your site! So glad I stumbled upon it 🙂
Kiersten Frase says
Thank you! 🙂 I hope you enjoy the recipe!
Jill Roberts @ WellnessGeeky says
I finally got to make this roasted garlic grilled cheese this past weekend and it was such a hit!! I'm also gonna pin this post on my Pinterest board my followers will love it. Thanks for sharing, Kiersten!
Katie Trant says
Glad you enjoyed this as much as we do!